

Although yoga and running lie on opposite ends of the exercise spectrum, the two need not be mutually exclusive.
During the course of an average mile run, your foot will strike the ground 1,000 times. The force of impact on each foot is about three to four times your weight.
All sports injuries are caused by imbalances. The pain most runners feel is not from the running in and of itself, but from imbalances that running causes and exacerbates. If you bring your body into balance through the practice of yoga, you can run long and hard for years to come. Yoga will help you increase range of motion, agility, flexibility, lung capacity, endurance, and strength.
Yoga on the Run
by Lynn Burgess
As a yoga teacher, I often hear runners complain of sore feet, bad backs and knees, tight hamstrings and hips. Over the years, I have watched runners, and others for that matter, with joint pain, back problems, muscle pulls, tendinitis, strains and sprains come to class and increase range of motion, agility, flexibility, lung capacity, endurance, strength and general body practice. Yoga has the ability to help all of us get better better in terms of healing and rehabilitation, better in terms of strength and flexibility, better in terms of the elimination of pain. If you would like to gradually integrate yoga into your workout routine, begin with these basic poses:
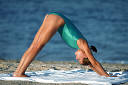
1. Downward-Facing Dog: From a position of all fours, lift the buttocks up toward the ceiling. Elongate the spine, and straighten the knees, and push the heels toward the floor as much as you can without forcing. Lift the wrists. Move the abdominal muscles in and keep them firm; drop your head toward the floor and let it hang loosely. Release after three breaths.
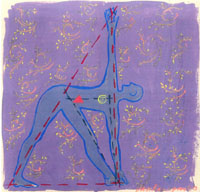
2. Triangle: Stand with your feet three to 3 - 3.5' apart. Turn your left foot in 30 degrees and your right foot out 90 degrees. Be sure that your right heel is in line with the arch of your left foot. Bring your hands into a T position and take a deep inhalation. Exhale and move your pelvis toward the left as you extend your torso to the side and over your right leg. Place your right hand down on your shin and stretch your left arm vertically overhead, palm forward. Turn your head to gaze softly at your left thumb. Hold for three breaths. Release by coming back to standing and practice on the opposite side.
3. Tree: Stand with your feet parallel. Bend your right knee and place your right foot as high as possible on your left inner thigh. Press your palms together in prayer position. Hold for three breaths. Release and practice on the opposite side.
4. Bound Angle: Sit straight and tall. Bend your knees out to the sides and place the soles of your feet together with your feet as close to your body as possible. Lift and lengthen your spine. Relax your throat. Relax your eyes. Inhale, do nothing. Exhale, soften and release the groins. The more you can soften the groins, the more the legs will release downward. Sit quietly without straining the thighs for two to five minutes breathing evenly. To release, straighten one leg at a time.
Lynn Burgess, M.B.A., is an alignment based yoga teacher in Sarasota, Florida. She is founder of Yoga from the Heart and the developer of Essential Yoga Real Yoga for Real People. Contact Lynn at (941) 379-8451 or by email.
Poses and Stretches for the Hips
The hip joint is formed where the pelvis and the thighbone (femur) meet. The muscles that surround the hip joint are connected to several places:
* the front of the spine
* the hip bones
* the sitting bones
* the lower back
* the thigh bones
* the lower leg (below the knees)
Underlying these muscles are smaller muscles and numerous ligaments that further stabilize the hip joint. The tilt of the pelvis is determined by how the thigh bones and the pelvis fit together. If the muscles, ligaments, or tendon that join the leg to the torso are too loose or too tight, they will affect how the pelvis rests on the thigh bones. If the muscles and ligaments around the hip joint are strong and flexible, the pelvic bones (these are the bones you rest your hand on when you put your hands on your hips) will be horizontal and symmetrical.
A simple way to increase hip flexibility is to sit on the floor more often. The hip joint is capable of an enormous range of movement, none of which is encouraged by chairs. Just sitting crossed-legged rotates the thigh bones, stretches the inner thighs, and flexes the knees. For beginners that are uncomfortable on the floor at first, sit on the edge of firmly bolded blankets or on a cushion.
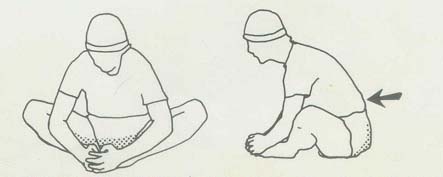
Sukhasana Simple Cross Legged Pose
1. Placement: Bend both of your knees and cross your ankles.
2. Pose: Exhale and bring the ankles in toward the groins. Use your hands to move the feet under the thighs so that the soles of the feet are inline with the outer thighs. Rest your hands on your knees. Do not collapse your lower back but lift your spine on exhalation. Balance evenly on the front of your sitting bones. Keep your chin parallel to the floor and your eyes and throat soft. Hold for fifteen seconds.
3. Benefits: Tailor pose opens the hips. It is a preparatory pose for more advanced sitting poses.
Sukhasana Modifications:
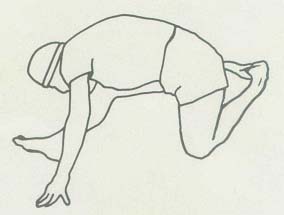
1. From Sukhasana, lean forward until you feel a good comfortable stretch.
2. Get your elbows out in front of you if you can. Hold and relax. Then, move your upper body over your knee instead of straight ahead. You will feel it in your hips. Think of bending from the hips.
Baddha Konasana Bound Angle Pose
Supta Baddha Konasana Reclining Bound Angle Pose
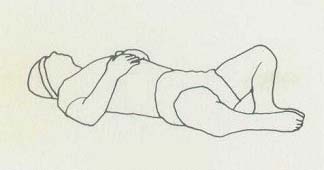
1. Partner Variations: Have a partner sit opposite you on the floor. Once in the pose, have your partner rest his or her legs on your thighs. The weight of your partners legs on your thighs will help your groins to release and your legs to drop toward the floor. Breathe to lengthen the spine, breathe to soften the groins.
2. Wall Variations: Learn to lengthen your spine in this pose by using a wall. Using your hands, gently roll your thighbones toward the floor and press your thighs back toward the wall.
3. Benefits: Baddha Konasana is excellent for the health of the pelvic region. It also stretches the inner legs and increases the mobility of the hips.
Lunge
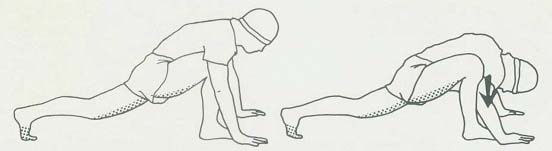
1. Placement: With your front knee directly above your ankle, shift your weight up onto the toes and ball of your back foot.
2. Stretch: Hold for 20 seconds with the back leg straight. Think of the front of your hip going down to create the right stretch tension.
3. Benefits: This stretches the groin, hamstrings, and hips, and possibly behind the knee of the back leg.
Lunge Variations:
1. Gently lower your upper body to the inside of the knee of the forward leg. Hold for 20 seconds.
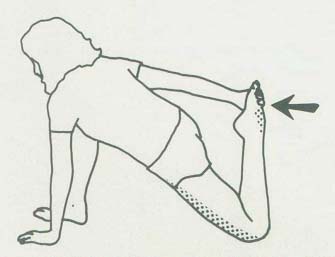
2. To stretch the quadriceps muscle, reach behind you with your right hand and grab the top of your left foot between your ankle and toes. Now slowly lower the front of your hip downward as you gently pull your left heel toward the middle of your buttocks until you feel a light stretch. Hold for 20 seconds.
Injury Prevention
Cross Training | Massage | Strengthening | Stretching | Yoga
|
For Email Marketing you can trust
|

|

|
RunnerGirl Bookstore |

|
|
|